
Your Mac says it’s downloading macOS Tahoe, the progress bar creeps up to 60%, and then it just… stops. Maybe you get a cryptic error. Maybe the screen freezes. Maybe it quietly dumps you back at your desktop like nothing happened.
Table Of Content
- Why macOS Updates Fail to Install
- Common Error Messages, Decoded
- 1. Check How Much Free Storage You Actually Have
- 2. Restart Your Mac Before Trying Again
- 3. Confirm Your Mac Is Actually Compatible
- 4. Check Apple’s System Status Page
- 5. Switch to a Wired or More Stable Network
- 6. Delete the Partially Downloaded Installer and Start Fresh
- 7. Free Up Space With NVRAM and SMC Resets (Intel Macs)
- 8. Boot Into Safe Mode and Retry
- 9. Run First Aid on Your Startup Disk
- 10. Reset Your Mac’s Date and Time
- 11. Use a Bootable Installer as a Workaround
- 12. Reinstall macOS via Recovery Mode
- Apple Silicon vs. Intel: Why Your Fix Might Differ
- Tips by Mac Model
- When to Just Wait Instead of Troubleshooting
- How to Avoid This Next Time
- Frequently Asked Questions
- Why does my Mac say “Not Enough Free Space” when I have space available?
- Can I install the latest macOS on an unsupported Mac?
- Why does the update keep restarting my Mac without finishing?
- Is it safe to force-quit a stuck macOS installer?
- Does a bootable USB installer erase my data?
- Will macOS 27 Golden Gate work on my Intel Mac?
- Why is my macOS update stuck at the same percentage for hours?
- How do I know if it’s a macOS installation error versus a hardware problem?
- The Bottom Line
If you’re trying to install the latest macOS update and getting nowhere, don’t panic this is one of the most common complaints on Apple’s support forums every time a new version ships, and it’s rarely as serious as it feels in the moment.
In almost every case, the culprit is one of a handful of usual suspects: not enough storage, a shaky connection, a corrupted download, or a Mac that’s simply aged out of support for that particular release. I’ve walked more Macs through failed updates than I can count, and the fixes below are the ones that actually move the needle, roughly in the order I’d try them myself.
Why macOS Updates Fail to Install
It helps to know what you’re dealing with before you start clicking around. Most failed installs come down to five root causes:
- Not enough free storage. The installer needs breathing room to stage files before it even begins often 25-45GB depending on the release, and that’s on top of whatever the final update actually takes up.
- An interrupted or corrupted download. Wi-Fi drops, VPNs, and Apple’s own servers getting hammered on release day all leave you with a partial download that fails validation partway through.
- Hardware that’s aged out. Every macOS release drops support for a batch of older Macs. If yours isn’t on that year’s compatibility list, the installer simply won’t run no error message is going to change that.
- Startup Security or firmware conflicts. More common on Apple Silicon Macs, usually after a previous update attempt didn’t finish cleanly.
- A stuck installer process left over from an earlier failed attempt, which can block a fresh one from ever starting.
Once you know which bucket you’re probably in, the fix usually takes ten minutes. The mistake most people make is jumping straight to a full reinstall that should be your last move, not your first.
Common Error Messages, Decoded
Apple’s error messages are frustratingly vague, but the exact wording usually points you somewhere useful:
- “An error occurred while installing macOS” — the classic non-answer. Almost always a corrupted download. Head to Fix #6.
- “Not enough free space” — self-explanatory on paper, but the real threshold is higher than most people assume. See Fix #1.
- “This copy of the Install macOS application can’t be verified” — the installer file itself is damaged. Delete it and start a fresh download rather than retrying the same one.
- Progress bar frozen at a fixed percentage (often somewhere around 30% or 60%) for an hour or more with no disk activity — usually network or disk related. Check Fixes #5 and #9.
- Mac restarts into the installer, then boots straight back to the desktop with nothing installed — often a disk permissions or startup security issue. Try Fix #9 or #7 first.
- “macOS could not be installed on your computer” with no other detail — nine times out of ten, this is a compatibility problem on older Intel hardware. Skip ahead to Fix #3.
If your exact message is up there, jump straight to the fix it points to. Otherwise, work through the list in order it’s built around how often each cause actually turns out to be the problem in practice, not just what’s theoretically possible.
1. Check How Much Free Storage You Actually Have
This is the single most common cause, and it’s worth ruling out first even if you’re pretty sure your drive has room. Go to Apple menu > About This Mac > Storage. macOS installers typically need 35-45GB free just to download and stage the update that’s working space during installation, not the final installed footprint.
If you’re under 50GB free, clear out more than you think you need. The installer briefly requires headroom on top of its own size, and cutting it close doesn’t give you a clean “not enough space” warning up front it tends to fail partway through instead, which is a far more annoying way to find out.
Quick ways to free up space fast:
- Empty the Trash (Finder > Trash > Empty) deleted files still count against your free space until you actually do this
- Delete large files sitting in Downloads that you’ve forgotten about; this folder tends to become a graveyard for old installers, disk images, and video files nobody remembers saving
- Offload unused apps under System Settings > General > Storage, which sorts everything by size so you can see exactly what’s eating your drive
- Clear out old iOS backups if you sync a phone through Finder these quietly eat 10-20GB per device and most people never look at them again
- Empty Mail’s local cache under System Settings > General > Storage > Mail, especially if you’ve had the same account running for years
If you’re a developer, don’t overlook Xcode’s derived data, old simulator files, or unused Docker images these routinely eat tens of gigabytes on machines that otherwise look fine on space. Run du -sh ~/Library/Developer/Xcode/DerivedData in Terminal and you’ll probably be surprised how much Xcode alone is holding onto.
2. Restart Your Mac Before Trying Again
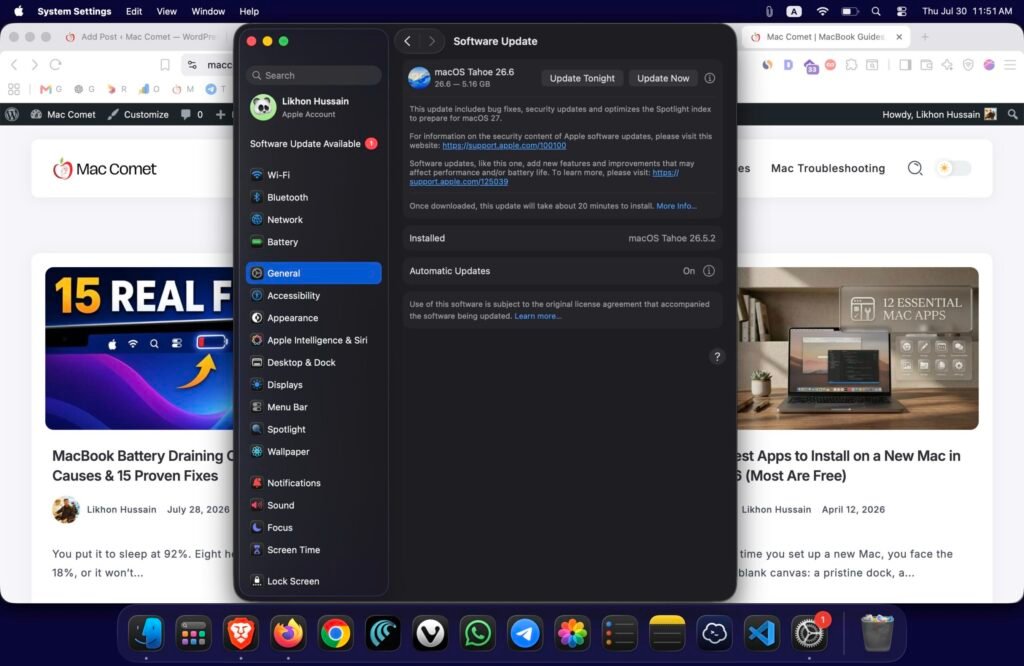
It sounds almost too simple to bother mentioning, but a restart clears stuck background processes, resets network connections, and closes out any half-finished installer state. Those three things alone cause a surprising number of silent update failures. Restart, then go straight to System Settings > General > Software Update and try again before touching anything else.
3. Confirm Your Mac Is Actually Compatible
Every year, the newest macOS drops support for the oldest models it used to run on. If your Mac isn’t compatible with the version you’re trying to install, the installer refuses to run sometimes with a clear message, sometimes by just failing without explanation.
macOS Tahoe runs on Macs released from 2019 onward, and it’s the last version of macOS that supports Intel hardware at all. Starting with macOS 27 Golden Gate, expected this fall, Apple is dropping Intel support entirely that release is Apple Silicon (M-series) only, full stop.
Check your model under Apple menu > About This Mac. If you’re on an older Intel Mac and Tahoe won’t install, this is very likely why, and no amount of troubleshooting is going to change it. You’re already running the last macOS version your hardware will ever officially support.
This isn’t limited to laptops. MacBook Air and MacBook Pro models from before 2019, older iMacs, and pre-2019 Mac minis are the most likely to have aged out. Mac Studio, being a newer product line, hasn’t run into this yet, and Apple Silicon Macs in general get longer support windows than the Intel models they replaced.
If your Mac genuinely isn’t supported, the honest advice is to stay put and keep it patched with security updates rather than fighting a losing battle against hardware Apple has moved on from.
4. Check Apple’s System Status Page
For the first few days after a release, Apple’s update servers take a beating. That shows up as downloads stalling at a specific percentage, verification errors, or installs failing with a vague network message that has nothing to do with your own connection.
Check apple.com/support/systemstatus if Software Update or the Mac App Store shows a service disruption, the fix is simply patience. Wait a few hours and try again. This happens more often than people expect, particularly in the 48 hours right after a major release.
5. Switch to a Wired or More Stable Network
Wi-Fi drops, weak signal, and VPNs are behind a lot of corrupted downloads. If you’re on Wi-Fi, move closer to your router, or better yet, plug in via Ethernet if your Mac supports it. Turn off any VPN before you download VPNs frequently interrupt large downloads or route them through servers that throttle them without telling you.
If you’re on a shared or public network office, university, coffee shop try the update from a home connection instead. Some networks throttle or outright block Apple’s update servers with no obvious error to warn you. This is especially common on university and corporate Wi-Fi, where IT departments sometimes rate-limit large downloads on purpose, and on hotel or coffee shop networks, where captive portals can silently kill background downloads mid-stream.
If you’re behind a managed firewall a work laptop, essentially check with IT before assuming the problem is on your end. Business users run into this specific cause more than most, since managed networks are exactly the kind most likely to restrict Apple’s update traffic deliberately.
6. Delete the Partially Downloaded Installer and Start Fresh
A download that failed partway through often leaves a corrupted installer file sitting on your drive, and macOS will keep trying to use it instead of grabbing a fresh copy. Clear it out manually:
- Open Finder, then press Cmd+Shift+G
- Go to /Applications
- Look for an installer app named something like “Install macOS Tahoe”
- If it’s there and the update still won’t run, delete it, then head back to System Settings > General > Software Update to re-download from scratch
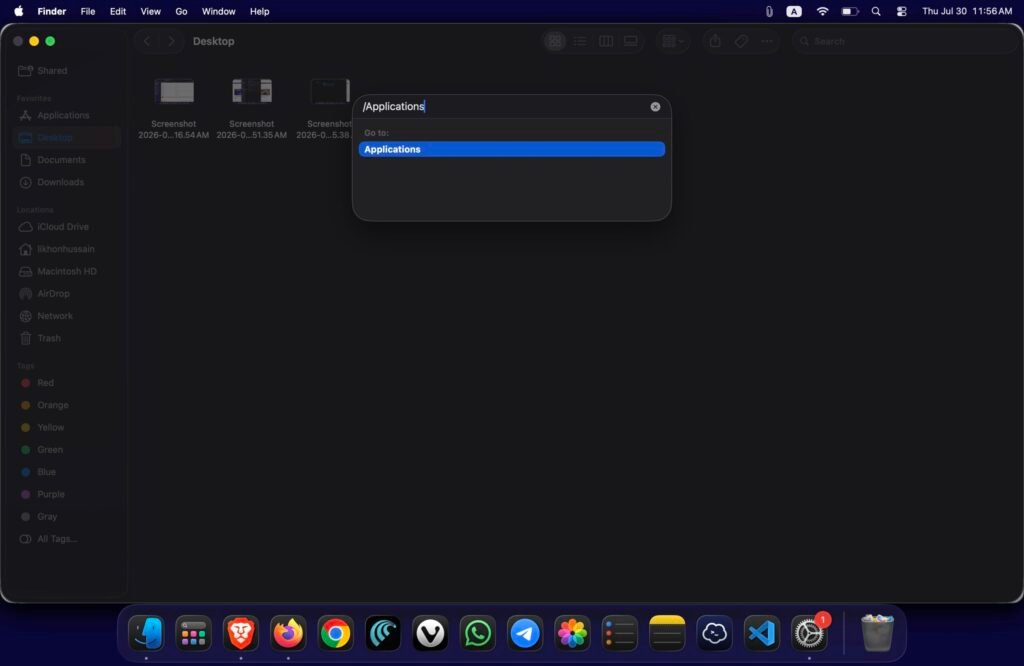
This forces a clean download instead of picking up a broken one where it left off, and it clears up a large share of “stuck at X%” complaints on its own.
7. Free Up Space With NVRAM and SMC Resets (Intel Macs)
If you’re on an Intel Mac and the installer fails without a clear reason, resetting NVRAM can clear out corrupted startup settings that get in the way of installation:
- Shut down completely
- Turn it on and immediately hold Option + Cmd + P + R
- Hold for about 20 seconds, until you hear the startup chime twice or on Macs without a chime, until the Apple logo appears and disappears twice
- Release, let it boot normally, then retry the update
Apple Silicon Macs handle this automatically at every startup, so there’s no manual equivalent here this step is Intel-only, and you can skip it entirely if you’re on an M-series Mac.
8. Boot Into Safe Mode and Retry
Safe Mode strips out non-essential kernel extensions and background processes, which can clear a conflict that’s quietly blocking the install without ever showing up as an error.
On Apple Silicon Macs:
- Shut down completely
- Press and hold the power button until “Loading startup options” appears
- Select your startup disk, then hold Shift and click “Continue in Safe Mode”
On Intel Macs:
- Restart and immediately hold Shift
- Release when the login window appears
Once you’re in Safe Mode, retry the update through Software Update. If it goes through, restart normally afterward you don’t want to stay in Safe Mode day to day.
9. Run First Aid on Your Startup Disk
Disk errors can silently stop an installer from writing files correctly, and this is one of those causes that never shows up in the actual error message. Open Disk Utility (Applications > Utilities), select your startup disk usually “Macintosh HD” and click First Aid. Let it run all the way through; it can take several minutes. Repair anything it flags, then retry the update.
10. Reset Your Mac’s Date and Time
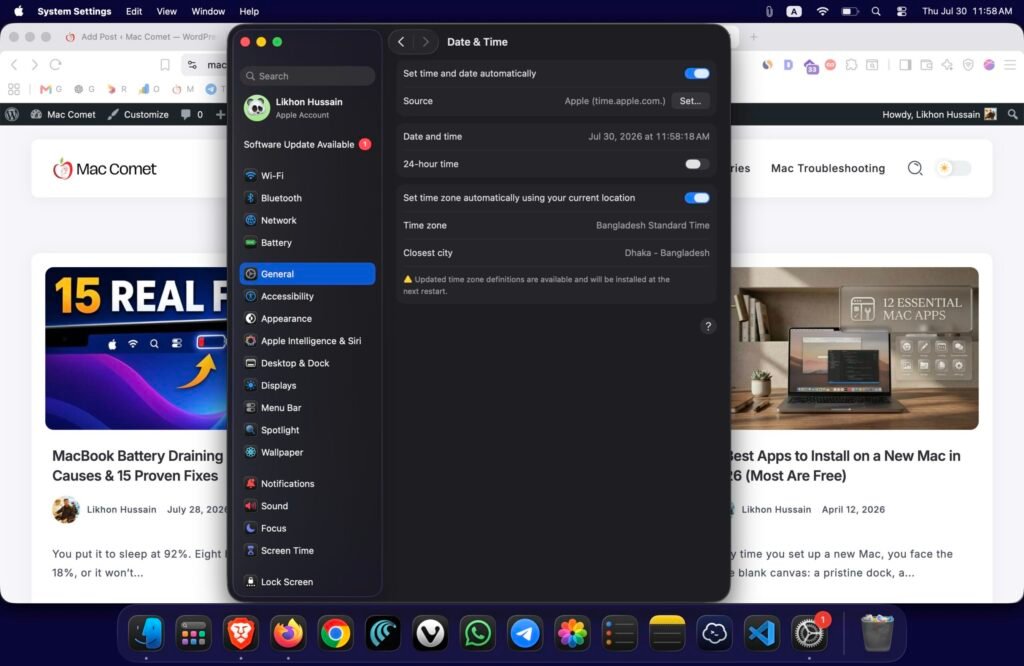
This one trips people up because it seems unrelated, but macOS update verification depends on your system clock being accurate. If the date and time are off common after a battery drain on older Macs, or just a manual change that stuck certificate verification for the update can fail without any obvious explanation. Go to System Settings > General > Date & Time and make sure “Set date and time automatically” is checked.
11. Use a Bootable Installer as a Workaround
If Software Update keeps failing but your Mac is otherwise compatible, building a bootable USB installer sidesteps whatever’s going wrong with the in-place update process entirely. It’s a more advanced fix, but a reliable one:
- On a Mac that’s already updated (yours, or a friend’s), download the full macOS installer from the Mac App Store
- Grab a 16GB+ USB drive and use Apple’s createinstallmedia Terminal command to build the bootable installer
- Boot the problem Mac from that drive hold the power button on Apple Silicon, or Option on Intel, at startup and run the installer directly from there
Because this skips network downloads during the actual install, it rules out most of the causes above in one move.
12. Reinstall macOS via Recovery Mode
If nothing above has worked, macOS Recovery lets you reinstall the operating system straight from Apple’s servers, independent of anything on your existing system:
Apple Silicon: Shut down, hold the power button until “Loading startup options” appears, choose Options > Continue, then select Reinstall macOS from the Utilities window.
Intel: Restart and hold Cmd+R until the Apple logo shows up, then choose Reinstall macOS.
This won’t erase your files, but back up anyway Time Machine or a cloud backup before doing anything at the Recovery level. Reinstalling from Recovery pulls a fresh copy of macOS directly from Apple rather than reusing anything already on your drive, which is exactly why it clears up problems a simple redownload through Software Update can’t. It rewrites core system files in the process, so it tends to fix subtle installer corruption that survives even a standard reinstall attempt.
Budget more time than a normal update often over an hour, depending on your connection since it’s pulling the full OS rather than a smaller delta update. Stay on power, stay on a stable connection, and don’t close the lid or let the Mac sleep partway through.
Apple Silicon vs. Intel: Why Your Fix Might Differ
| Apple Silicon (M1-M4) | Intel | |
| NVRAM/PRAM reset needed | No, automatic | Yes, manual |
| Supported by macOS 27 | Yes | No |
| Safe Mode entry | Hold power button | Hold Shift at startup |
| Recovery Mode entry | Hold power button | Cmd+R at startup |
| Most common failure cause | Storage, network | Storage, hardware age |
If you’re on an Intel Mac, treat compatibility (Fix #3) as your first real check rather than a last resort. A growing share of “my Mac won’t update” reports on Intel hardware turn out to be the Mac simply reaching end of support, not a fixable error at all.
Tips by Mac Model
The core fixes apply across the board, but a few things differ depending on what you’re actually running:
MacBook Air: Fanless design means it can throttle itself under the sustained load of a long install, which occasionally drags the process to a crawl. Keep it plugged in and on a hard, flat surface a bed or couch blocks airflow and makes throttling worse than it needs to be.
MacBook Pro: More thermal headroom than the Air, so install slowdowns are less common. If you’re on a 2018 or 2019 Intel 13-inch model, check compatibility (Fix #3) first a few of these sit right at the edge of Tahoe’s supported list.
iMac: Desktop Macs rarely run into storage or thermal problems, so a failed install here more often points to network issues (Fix #5) or a stuck installer file (Fix #6).
Mac mini: A popular budget pick with limited storage, which makes Fix #1 disproportionately relevant base models with 256GB drives run out of headroom faster than most people expect.
Mac Studio: Rarely has compatibility or storage problems given its specs, so failures here are almost always network-related or tied to a corrupted download.
Apple Silicon generally: Skip Fix #7’s NVRAM reset entirely it’s automatic, and there’s no manual version to run. Focus your energy on storage, Safe Mode, and Recovery Mode instead.
When to Just Wait Instead of Troubleshooting
Not every failed install actually needs a fix. If you’re updating within the first few days of a new release, especially a major one, server overload on Apple’s end is genuinely common and has nothing to do with your Mac. Signs that point toward “wait it out” rather than “keep digging”:
- The download stalls at the same percentage every single time, with no error message
- Apple’s system status page is already showing a service issue
- You’re within 72 hours of a major release
If neither of those apply and you’re still stuck after working through the fixes above in order, it’s time to back up and move to Fix #11 or #12 rather than repeating the same failed attempt and hoping for a different result.
How to Avoid This Next Time
Once you’re back up and running, a few habits make the next update far less likely to give you trouble:
- Skip release day unless there’s a feature you actually need. Waiting a week or two lets Apple ship the inevitable early bug fixes and takes the load off their servers, which is when most download failures happen in the first place.
- Keep 60-80GB free as a standing habit, not just when an update is looming. That gives every future installer comfortable headroom without a last-minute scramble to delete files.
- Turn on automatic updates for security patches (System Settings > General > Software Update > Automatic Updates), even if you’d rather manually control major version jumps yourself. Small, incremental updates almost never fail the way major version upgrades do.
- Back up before every major update, not just after something’s already gone sideways. A current Time Machine backup turns a failed install into a non-event instead of a stressful evening worst case, you restore and try again later.
- Check compatibility before Apple tells you no. If your Mac is more than five years old, look up its support status ahead of a major release instead of discovering the hard way, mid-download.
Frequently Asked Questions
Why does my Mac say “Not Enough Free Space” when I have space available?
The installer needs working space beyond its own file size to stage the update, often 15-20GB more than the download itself. If Storage shows you’re under roughly 50GB free, clear more before you retry, even if the installer’s listed size looks smaller than what you already have available.
Can I install the latest macOS on an unsupported Mac?
No. Apple ties each macOS release to a specific list of compatible models, and there’s no officially supported way around that on hardware it doesn’t cover. Third-party patchers exist, but they’re unstable and unsupported not something worth risking on a Mac you actually depend on.
Why does the update keep restarting my Mac without finishing?
This usually comes down to a corrupted installer download or a disk error. Delete the partial installer (Fix #6), run First Aid on your startup disk (Fix #9), and re-download from scratch instead of letting it retry automatically with the same broken file.
Is it safe to force-quit a stuck macOS installer?
Yes, if it’s been sitting at the same point for over an hour with no progress. Force-quitting a genuinely frozen process is safer than leaving it be just don’t do it during the active “Installing” phase after your Mac has already restarted into the installer environment, since that’s when it’s actually writing system files.
Does a bootable USB installer erase my data?
No. Running the installer from a USB drive performs the same in-place upgrade Software Update does, and it doesn’t touch your files. A full erase-and-install is a separate, deliberate step you take inside Disk Utility the installer never does it on its own.
Will macOS 27 Golden Gate work on my Intel Mac?
No. Apple has confirmed that macOS 27 Golden Gate drops Intel support entirely and runs on Apple Silicon Macs only. macOS Tahoe (26) is the final version that supports Intel hardware, so Intel Macs will keep getting security updates on Tahoe instead of moving to Golden Gate.
Why is my macOS update stuck at the same percentage for hours?
A stalled percentage with no disk activity almost always means the download itself has stopped moving, usually from a network interruption rather than anything actually processing in the background. Cancel it, check Apple’s system status page, switch to a more stable connection, and start the download over instead of waiting indefinitely for it to budge.
How do I know if it’s a macOS installation error versus a hardware problem?
If the same failure keeps happening across multiple fresh attempts, including after a clean reinstall through Recovery Mode, that points toward hardware usually failing storage. Disk Utility’s First Aid will typically flag drive-level issues; if it reports something it can’t repair on its own, that’s your cue to get the drive checked rather than keep troubleshooting software.
The Bottom Line
Most failed macOS installs come down to storage, a corrupted download, or a network hiccup all fixable in a few minutes with Fixes #1 through #6. If you’ve worked through those and you’re on an older Intel Mac, check compatibility before sinking more time into it: some Macs simply can’t run the newest release, and that’s expected, not a bug. For everyone else still stuck, a bootable installer or a Recovery Mode reinstall (Fixes #11 and #12) clears up nearly everything left over.
Still stuck after all of that? Back up your Mac before you do anything else persistent install failures that survive a clean reinstall usually point to a hardware issue worth a proper diagnosis, not more software troubleshooting.